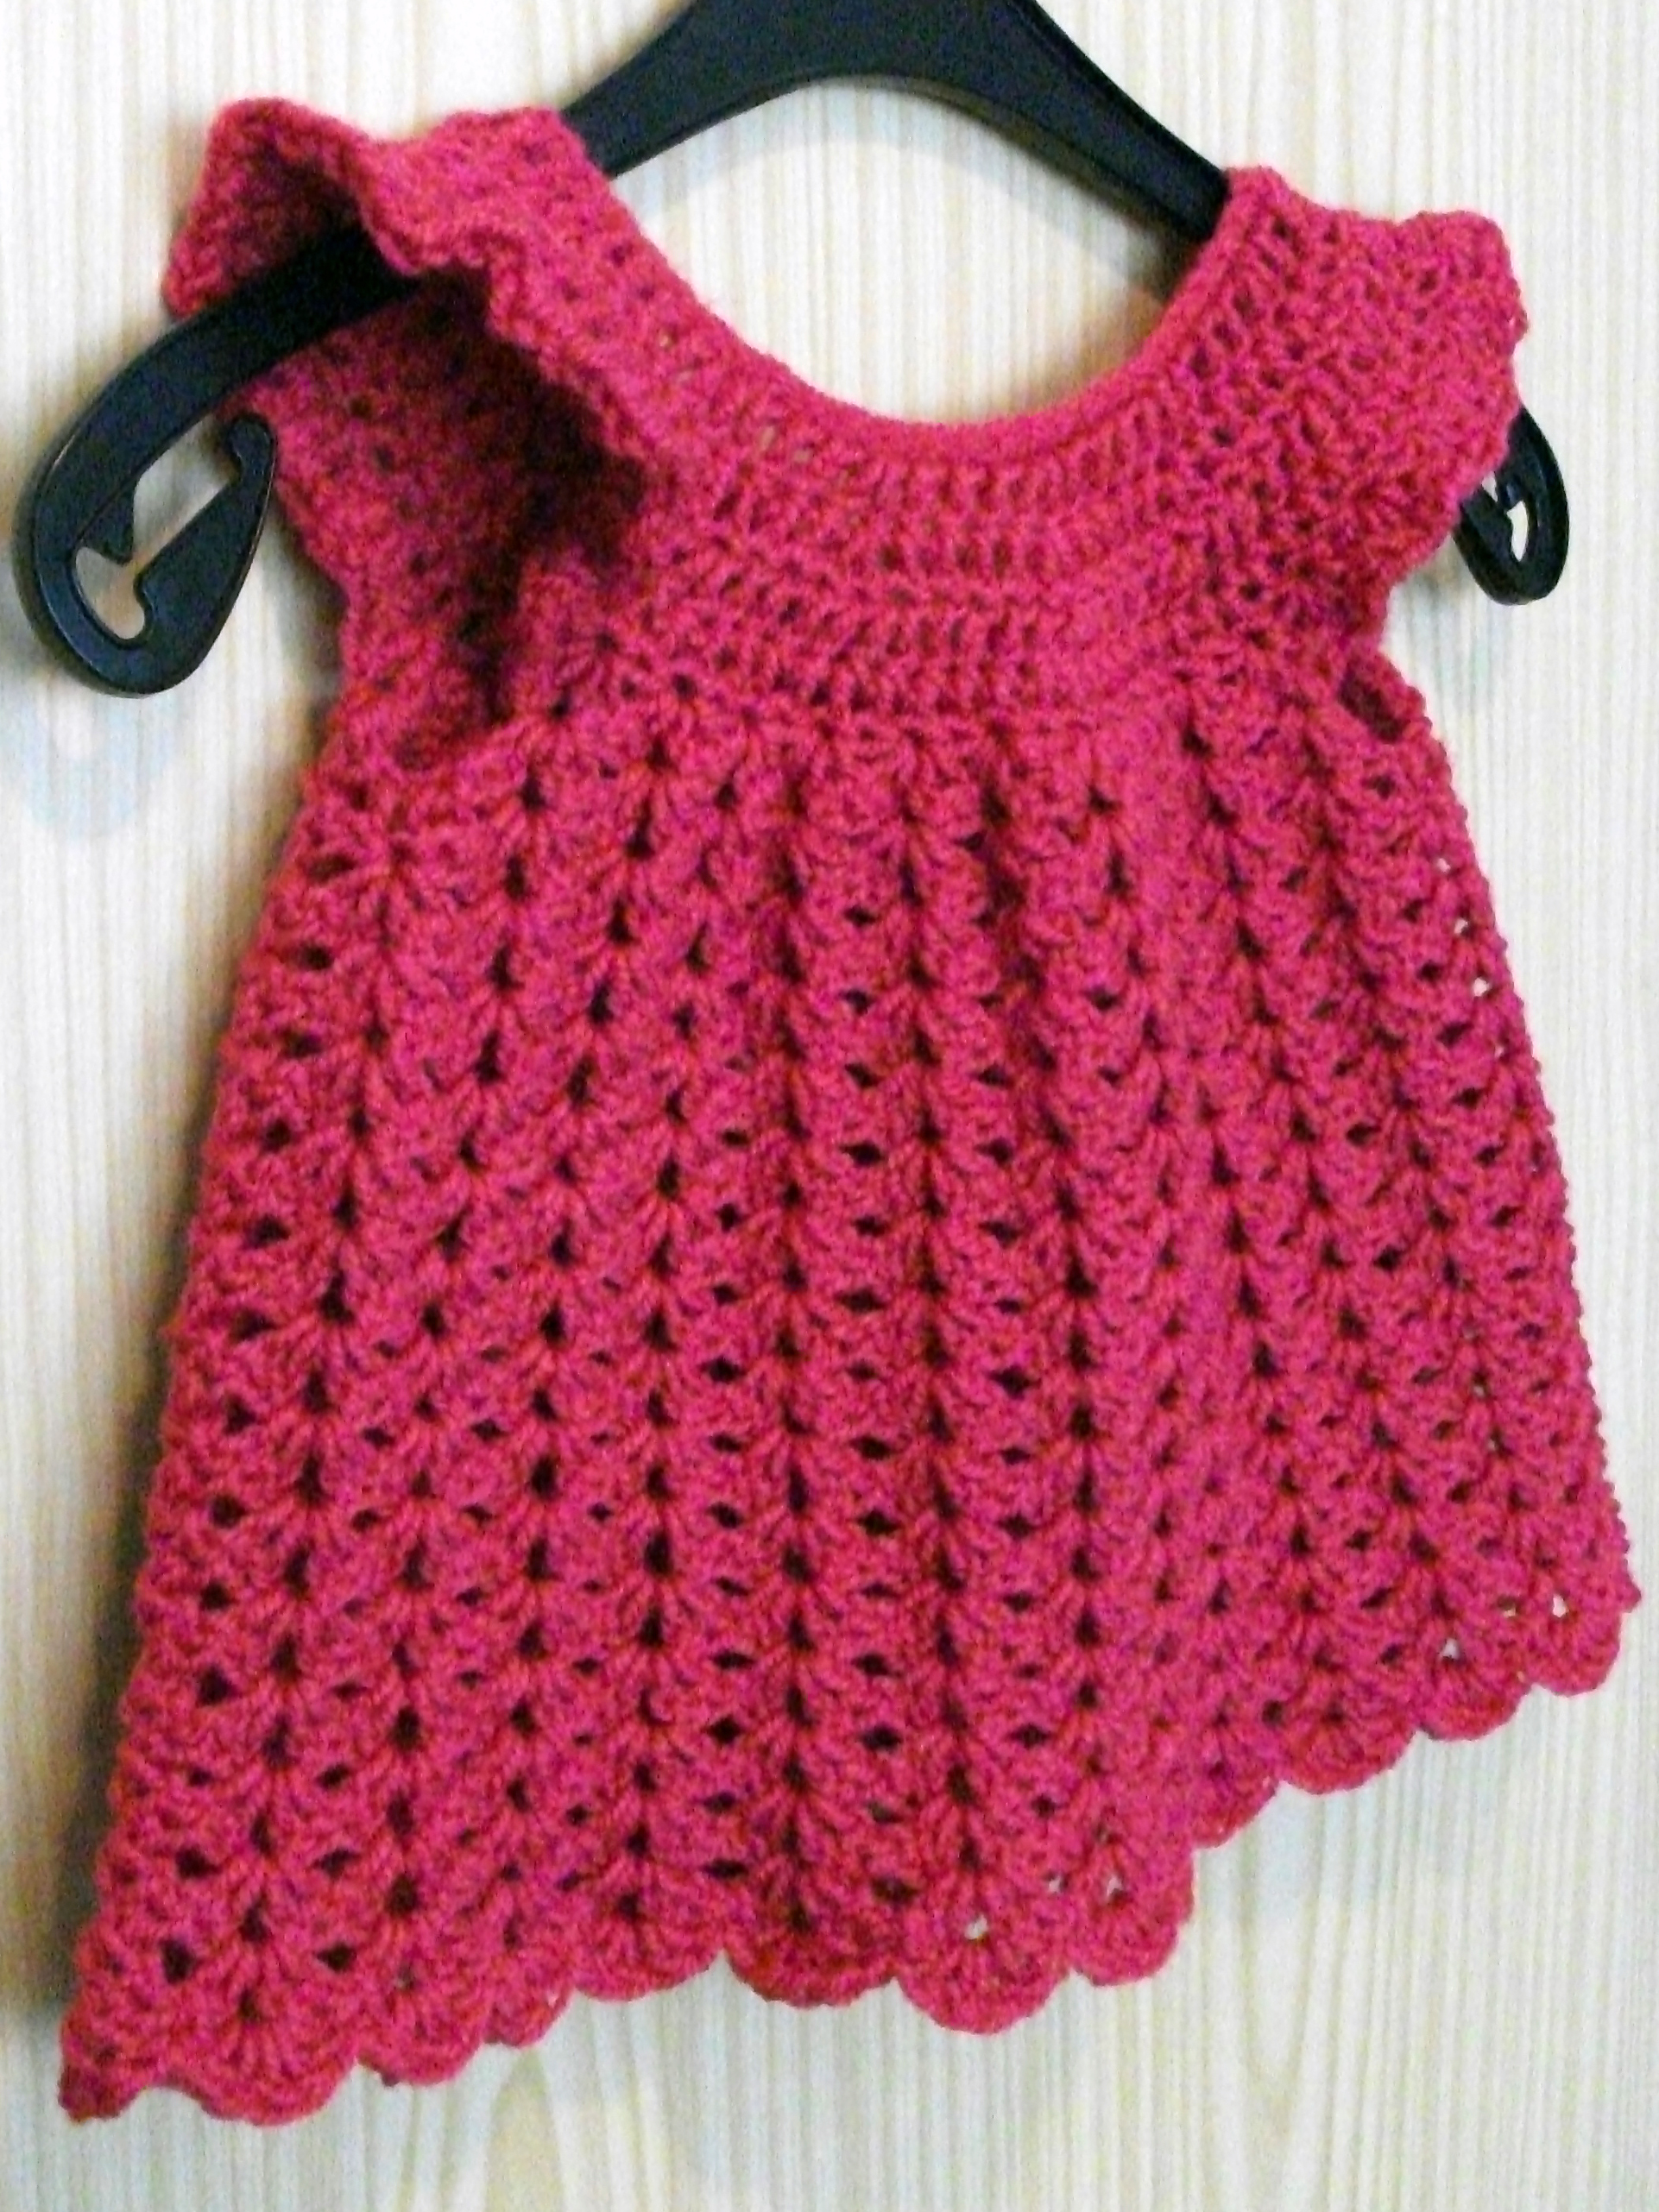
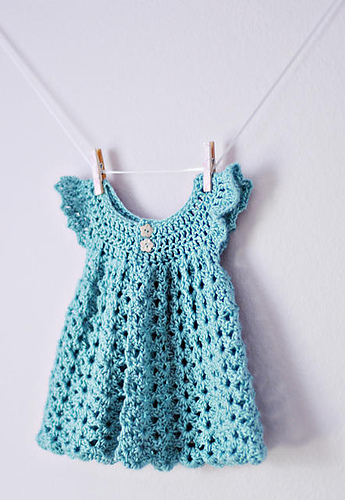
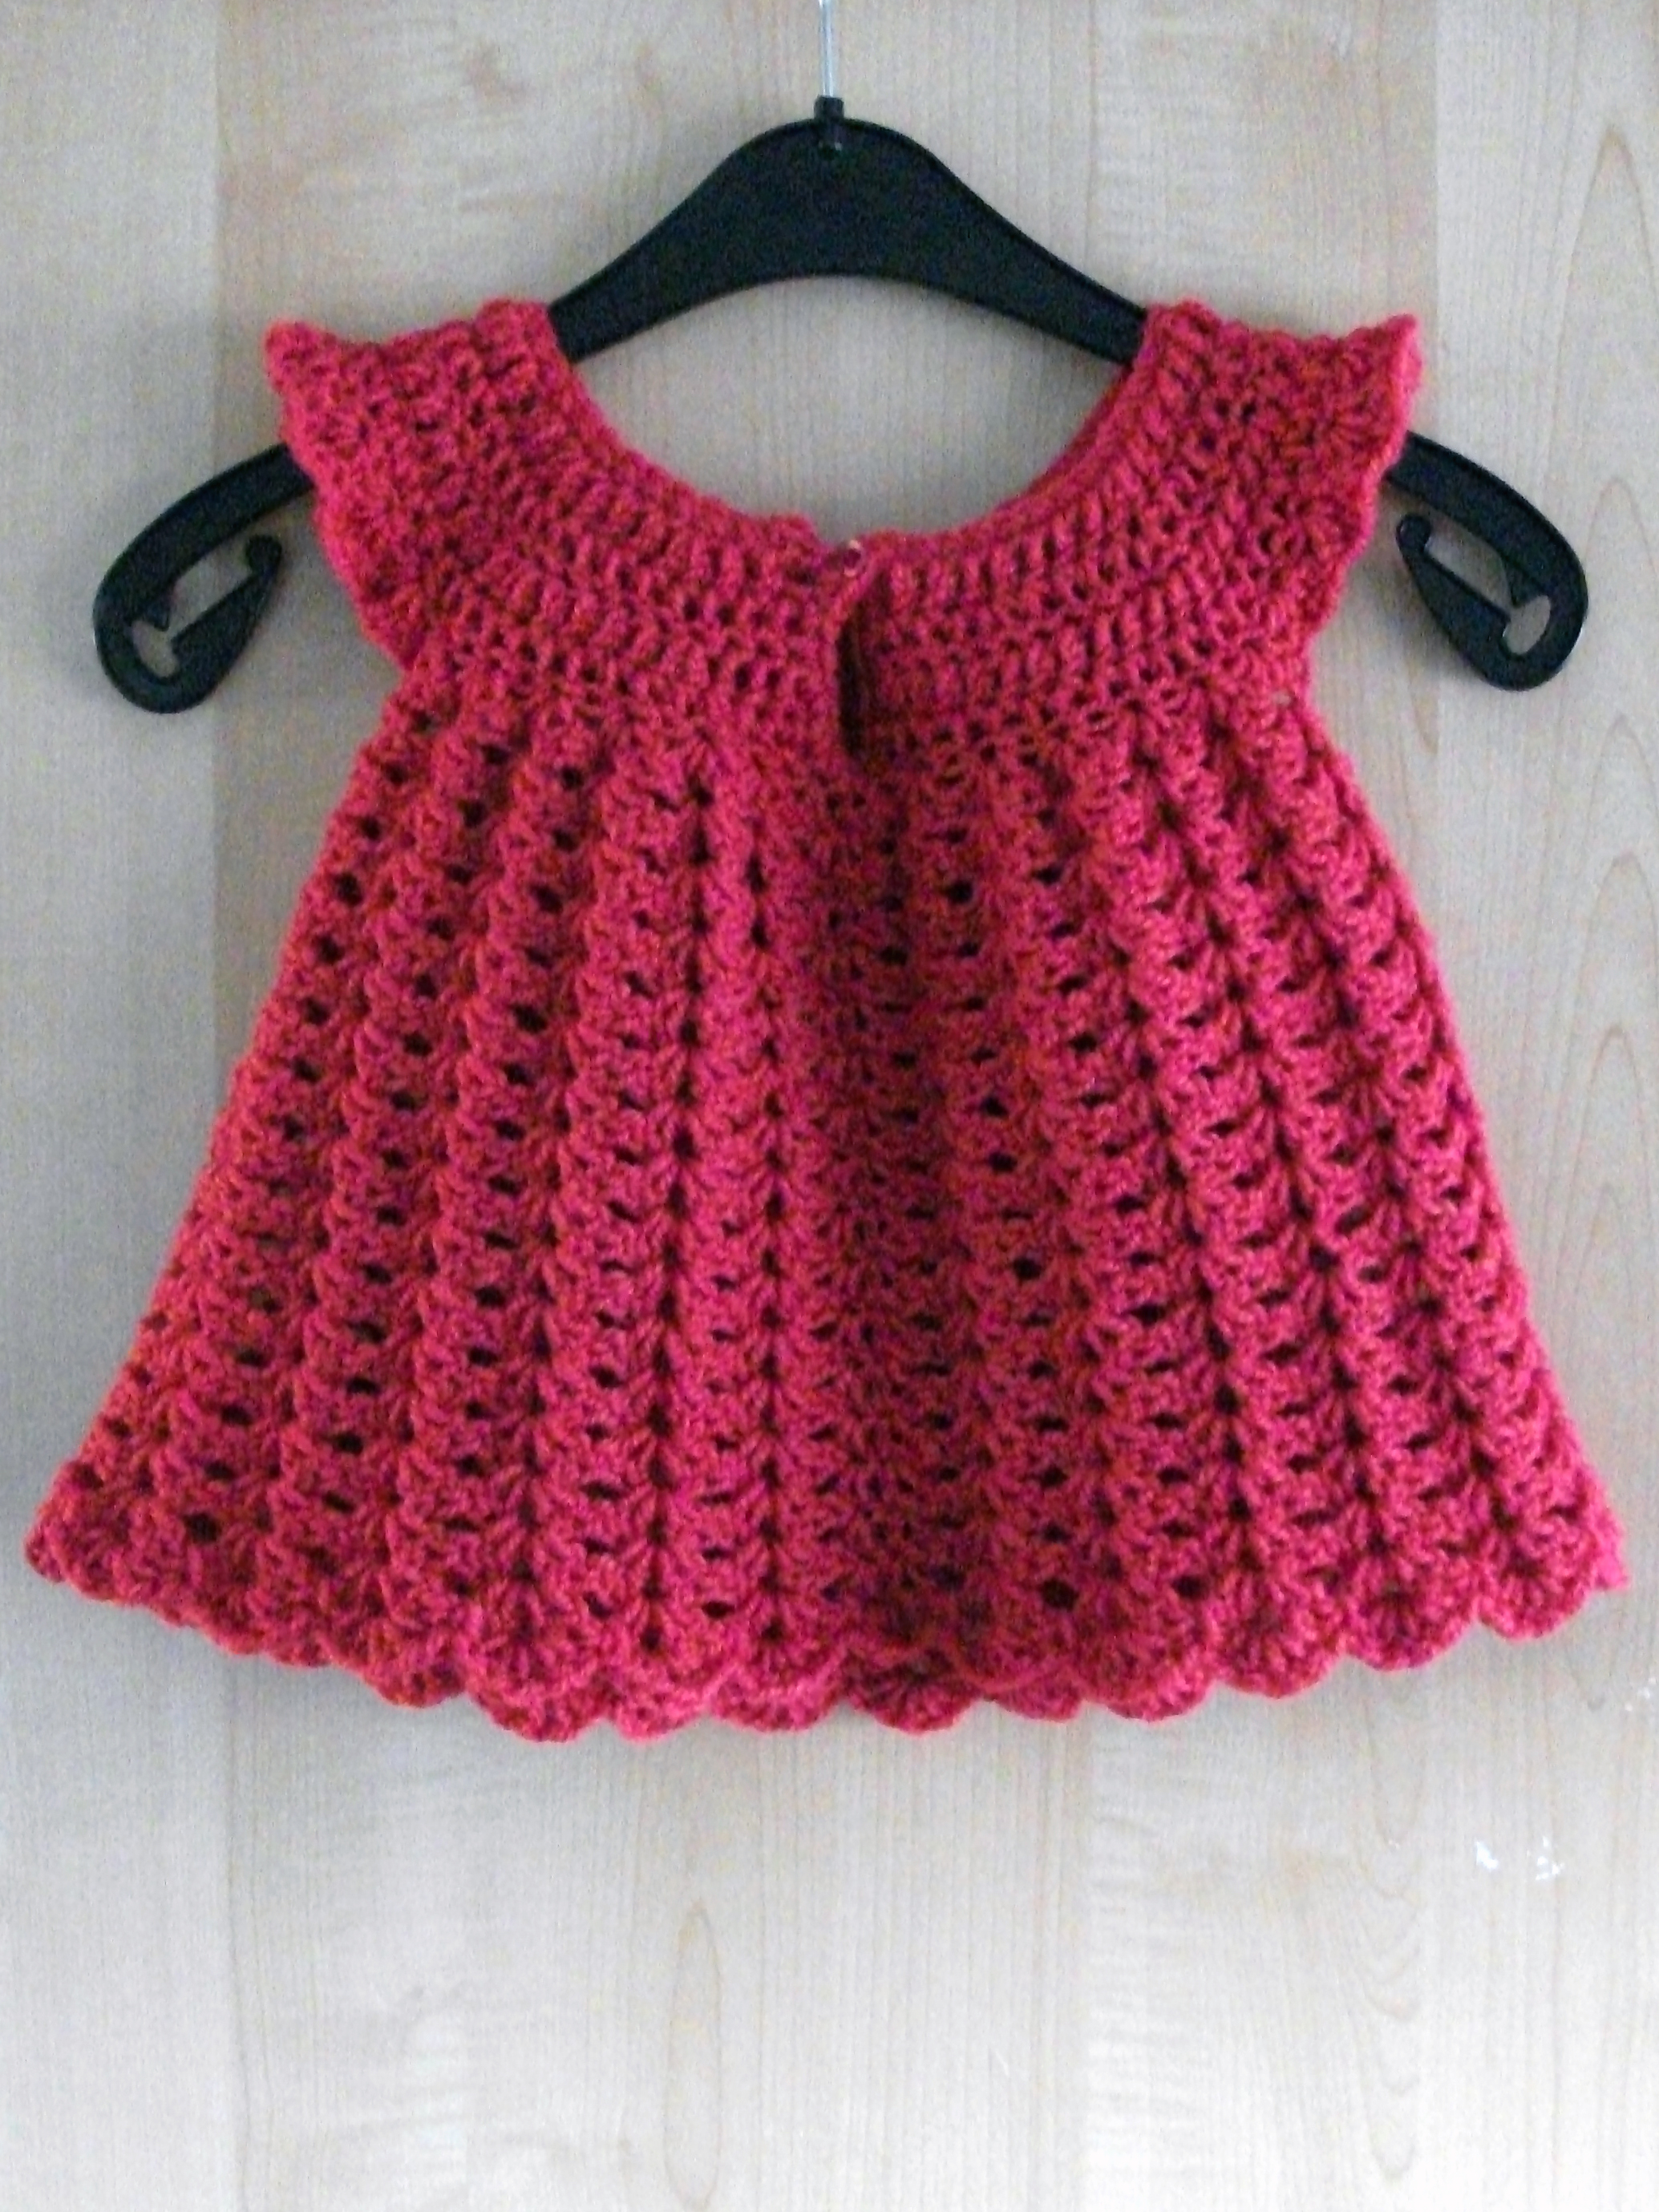
The original pattern for this dress is, as its name says, actually a pinafore, which means it is made to be open at the back. The pattern is a free one by Maxine Gonser.
I made some small adjustments to make an actual dress. Below I’ll provide a copy of the actual pattern in black text. My adjustments are added in blue text.
Have fun!
Angel Wings Pinafore © Maxine Gonser
Original: here
Yarn:
On Ravelry they suggest Bernat Baby Sport Solid, an acrylic yarn with a recommended hook of 4mm. The stated amount of yarn needed it approx. 3oz or 85g.
I used Bergère de France Sport, an acrylic-wool blend with a recommended hook of 3.5 and 4mm. I used a total of 3 skeins, but I made the pattern slightly larger than the original pattern.
Size: newborn – 3 months
My dress fits my niece of 8 months very widely. So she’ll be able to wear it a couple of months more!
Gauge: 7 sts =2 inches 2 rows of dc = 1 inch
I didn’t make a gaugeswatch.
Hook size: 5.0 mm (H)
Because I intended the dress for my niece, older than 3 months, I opted to use a bigger hook. I used an 8mm to cast on and a 7mm for the rest.
Abbreviations:
All terms are US-terms
ch = chain
sls = slip stitch
sc = single crochet
dc = double crochet
shell = (dc 2, ch1, dc 2) in appointed space
st = stitch
sts = stitches
Body
Start: ch 52
Row 1: sc in second ch from hook an in each ch across. [51]
Row 2: ch 3. turn. dc in each of next 2 sts. * 2dc in next st. dc in each of next 3 sts. repeat from * 11 times. dc in each remaining sts to the end. [63]
Row 3: ch 3. turn. dc in each of the next 3 sts. * 2dc in the next st. dc in each of the next 4 sts repeat from * 11 times. dc in each remaining st. dc on top of ch 3. [75]
Row 4: ch 3.turn. dc in each of the next 3 sts. * 2 dc in the next st.dc in each of the next 4 sts. repeat from * 13 times. dc in each of the remaining sts, dc on top of ch 3. [89]
Row 4b: ch3, turn. dc in each st until end, without increasing. [89]
Skirt
After my extra row (4b) I started crocheting in the round, instead of in rows.
The original instructions are copied below in regular text. My adjustments are in blue text.
Row 5: ch 3. turn. dc in the same st. * skip next st. shell (2dc ch 2 2dc) in next st. repeat from * to end 2dc on top of ch 3. [43 shells]
Row 5 = Round 1: sls in top of beginning ch3 of row 4b, to connect both pieces. Make sure the work isn’t turned on itself. ch3, dc in same st as sls. * skip next st; shell in next st. Repeat from * until end. Skip next stitch, 2dc in last st. sls in top of beginning chain.
Row 6: ch 3 . turn. dc in the same st. shell in next 6 shells. ch 3. skip next 10 shells. shell in next 11 shells. ch 3. skip next 10 shells. shell in next 6 shells 2dc on top of ch 3.
Row 6 = Round 2: ch3, dc in same st as sls. Shell in next 6 shells; ch3. Skip next 10 shells. Shell in next 11 shells; ch3. Skip next 10 shells. Shell in next 6 shells. Skip dc. 2dc in last dc. Sls in top of beginning chain.
Row 7: ch 3. turn. dc in same st. shell in next 6 shells. dc in each of next 3 ch. shell in next 11 shells. dc in each of 3 ch, shell in next 6 shells. 2dc on top of ch 3
Row 7 = Round 3: ch 3, dc in same st as sls. Shell in next 6 shells. dc in each of next 3 ch. Shell in next 11 shells. dc in each of 3 ch. shell in next 6 shells. 2dc in last dc. sls in top of beginning chain.
Row 8: ch 3. turn. dc in same st. shell in next 6 shells. skip first dc of underarm and shell in next dc. shell in next 11 shells. skip first dc of underarm and shell in next dc.shell in next 6 shells. 2dc on top of ch 3. [25 shells]
Row 8 = Round 4: ch 3, dc in same st as sls. Shell in next 6 shells. skip first dc of underarm and shell in next dc. Shell in next 11 shells. skip dc of underarm and shell in next dc. Shell in next 6 shells. 2dc in last dc. sls in top of beginning chain.
Row 9: ch 3. turn. dc in same st. shell in each shell to end. 2dc on top of ch 3.
Row 9 = Round 5: ch3, dc in same st as sls. Shell in each shell to end. 2dc in last dc. sls in top of beginning chain.
Row 10-17: repeat row 9. (so originally 8 repeats)
Row 10-17 = Round 6-13 Repeat row 9. (8 repeats)
Because I wanted a longer skirt, I repeated row 9 an additional 3 times:
Round 14-16: Repeat row 9. (3 extra repeats)
Row 18: ch 3. turn. dc in same st. sc in space before shell.* 5dc in shell. sc in space between shells. repeat from * to the end. sc in space after last shell. 2dc on top of ch 3
Row 18 = Round 21: ch3, dc in same st as sls. sc in space before shell. * 5dc in shell. sc in space between shells. repeat from * to the end. sc in space after last shell. 2dc in last dc. sls in top of beginning chain.
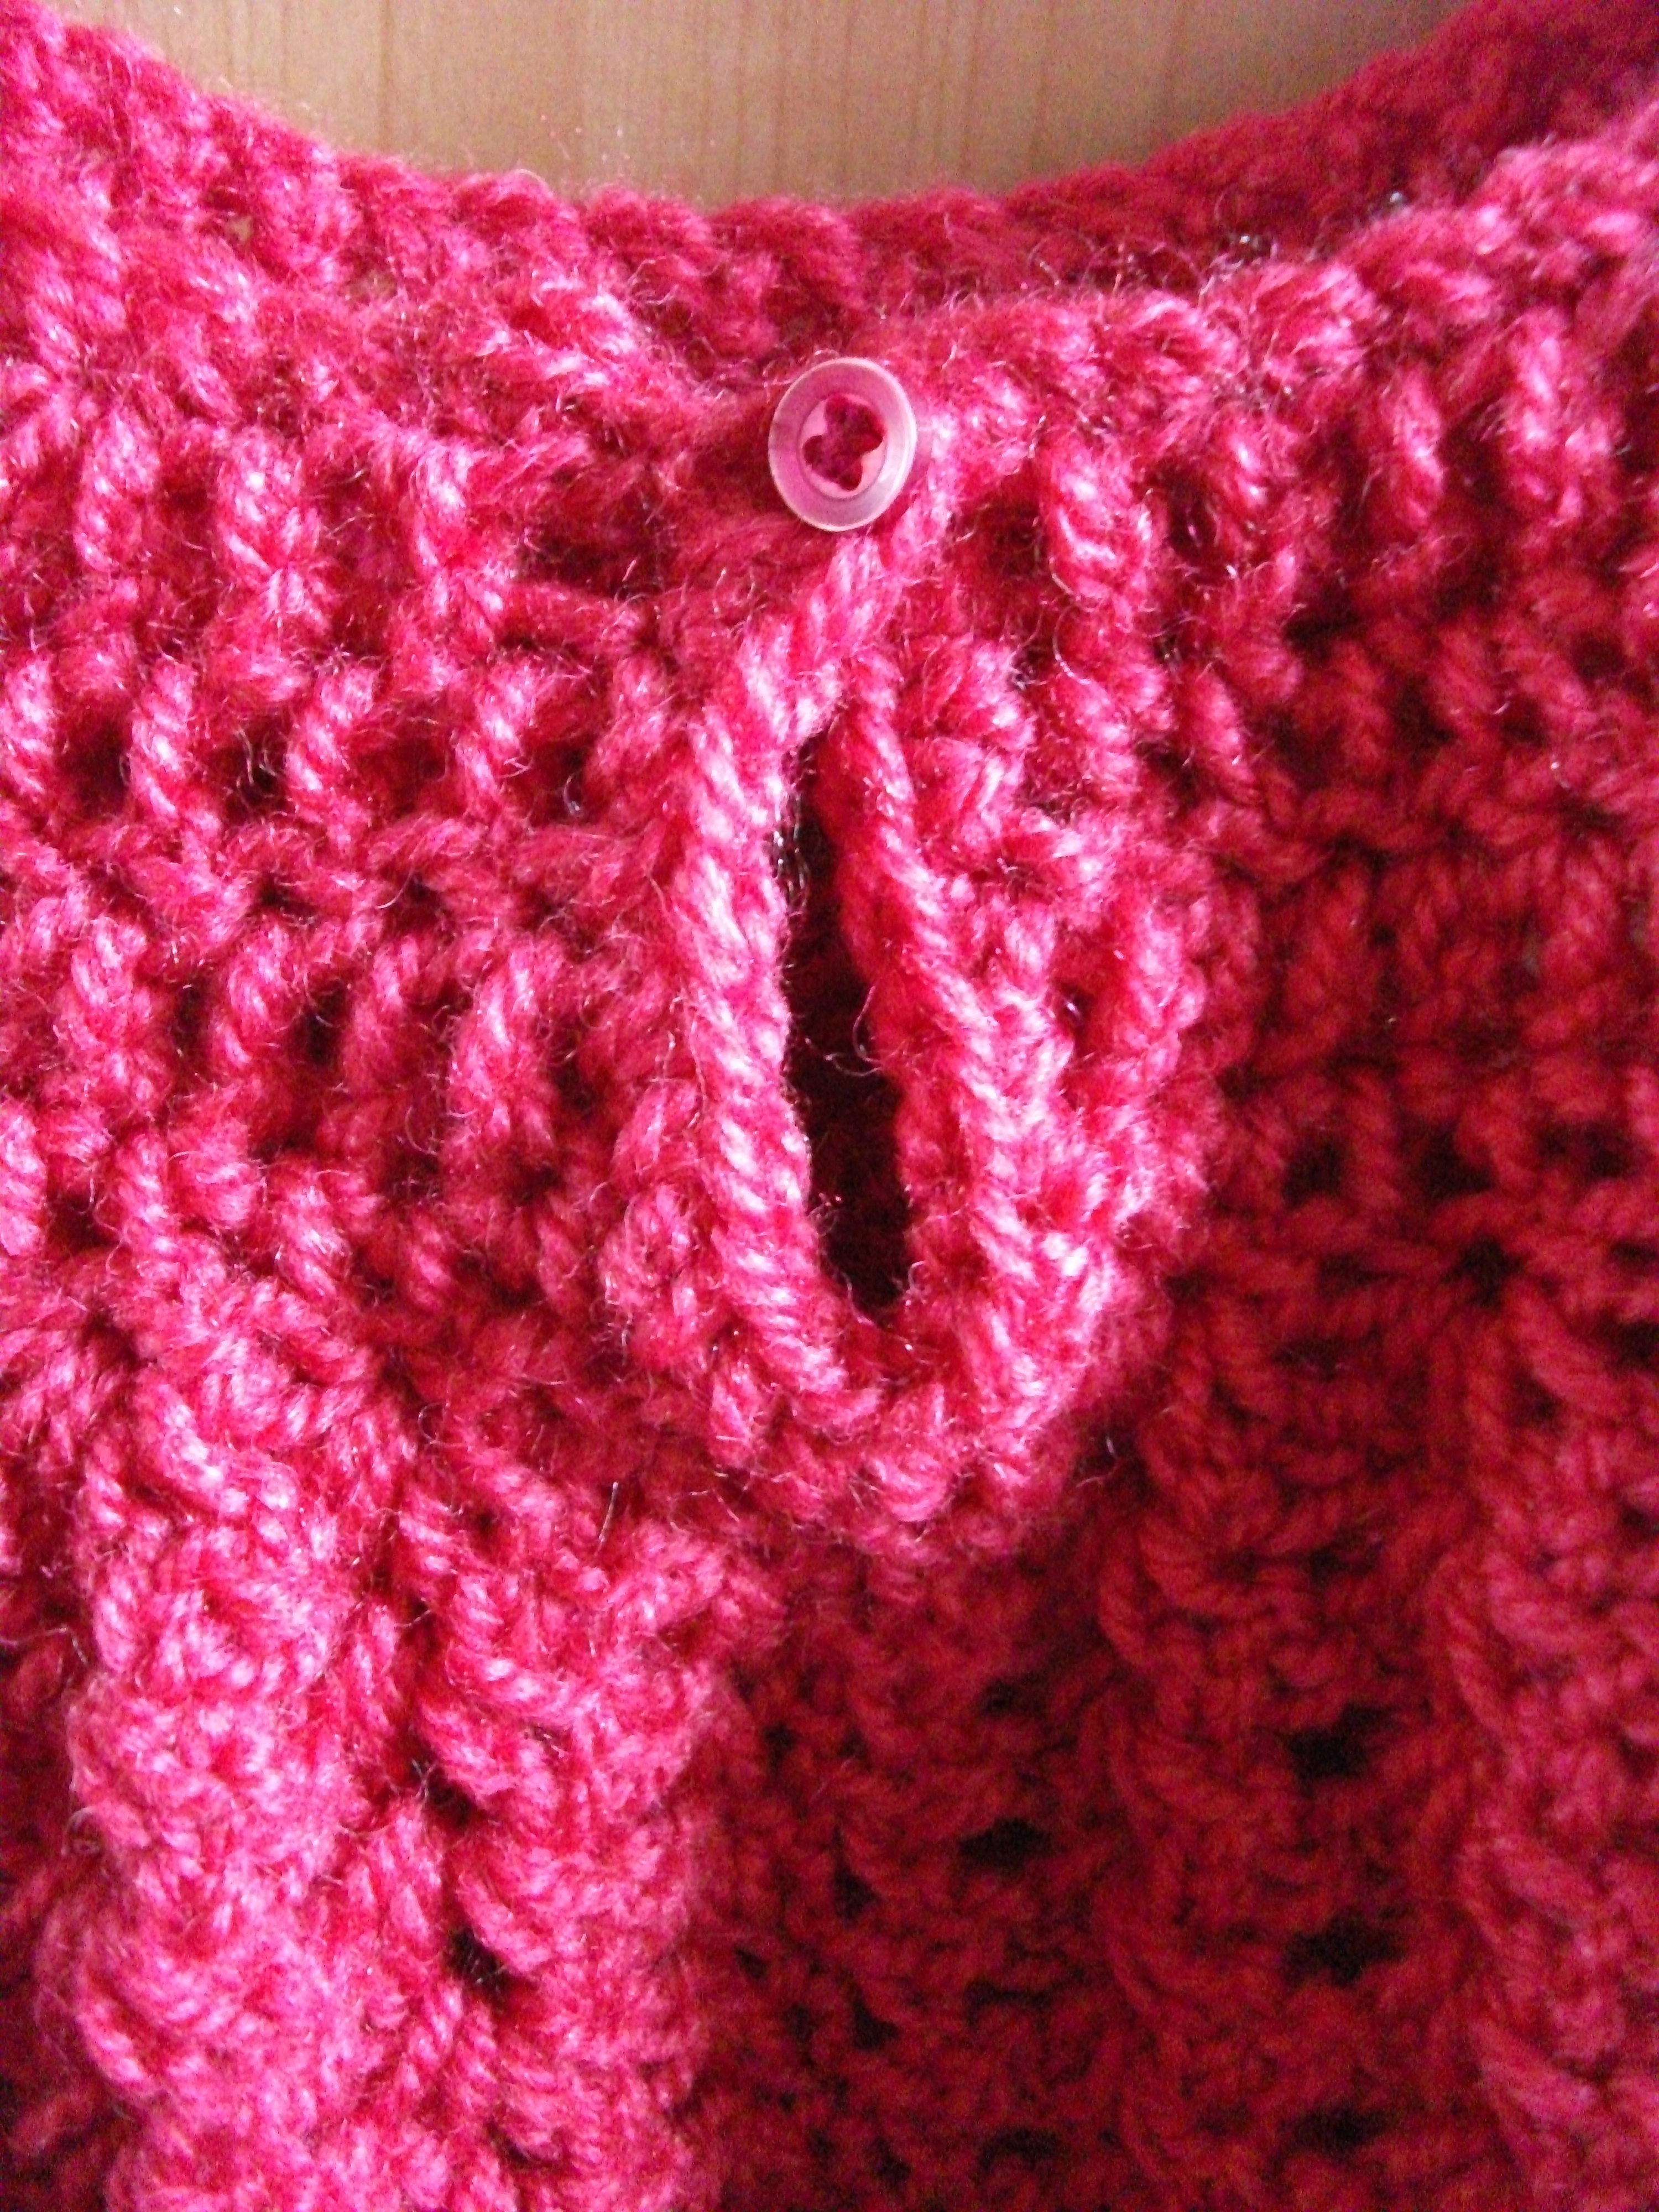
sew 3 buttons on the rt side of the yoke. use space at end of rows for buttonholes. you can also sc up the back side . working 3 ch2 loops for buttonholes on the left side. sc across the neckline and sc down the other side.
If you crocheted a closed skirt (blue instructions), than you now only have a small opening at the top of the neck.
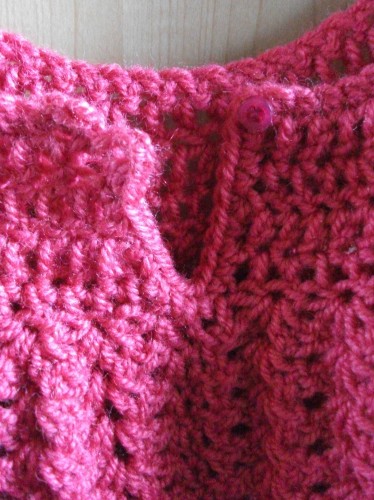
Around this opening I crocheted sc and created a loop of 2 chains on the left side. On the right side I sewed on a tiny button.

And that’s it. With these instructions you should be able to make exactly the same dress as me!
Cheers,
Charlotte